Using rtl_433 in Home Assistant
Why?
I’ve had Home Assistant running for a while and wanted to track my water and power usage. While there aren’t any HA integrations for my utility providers or the meters, they both output their data on the 915 MHz ISM band. This makes it easy to use an SDR dongle and rtl_433 to receive the data, publish it to MQTT, and configure sensors in HA.
Plus I wanted to use the fancy Engergy dashboard: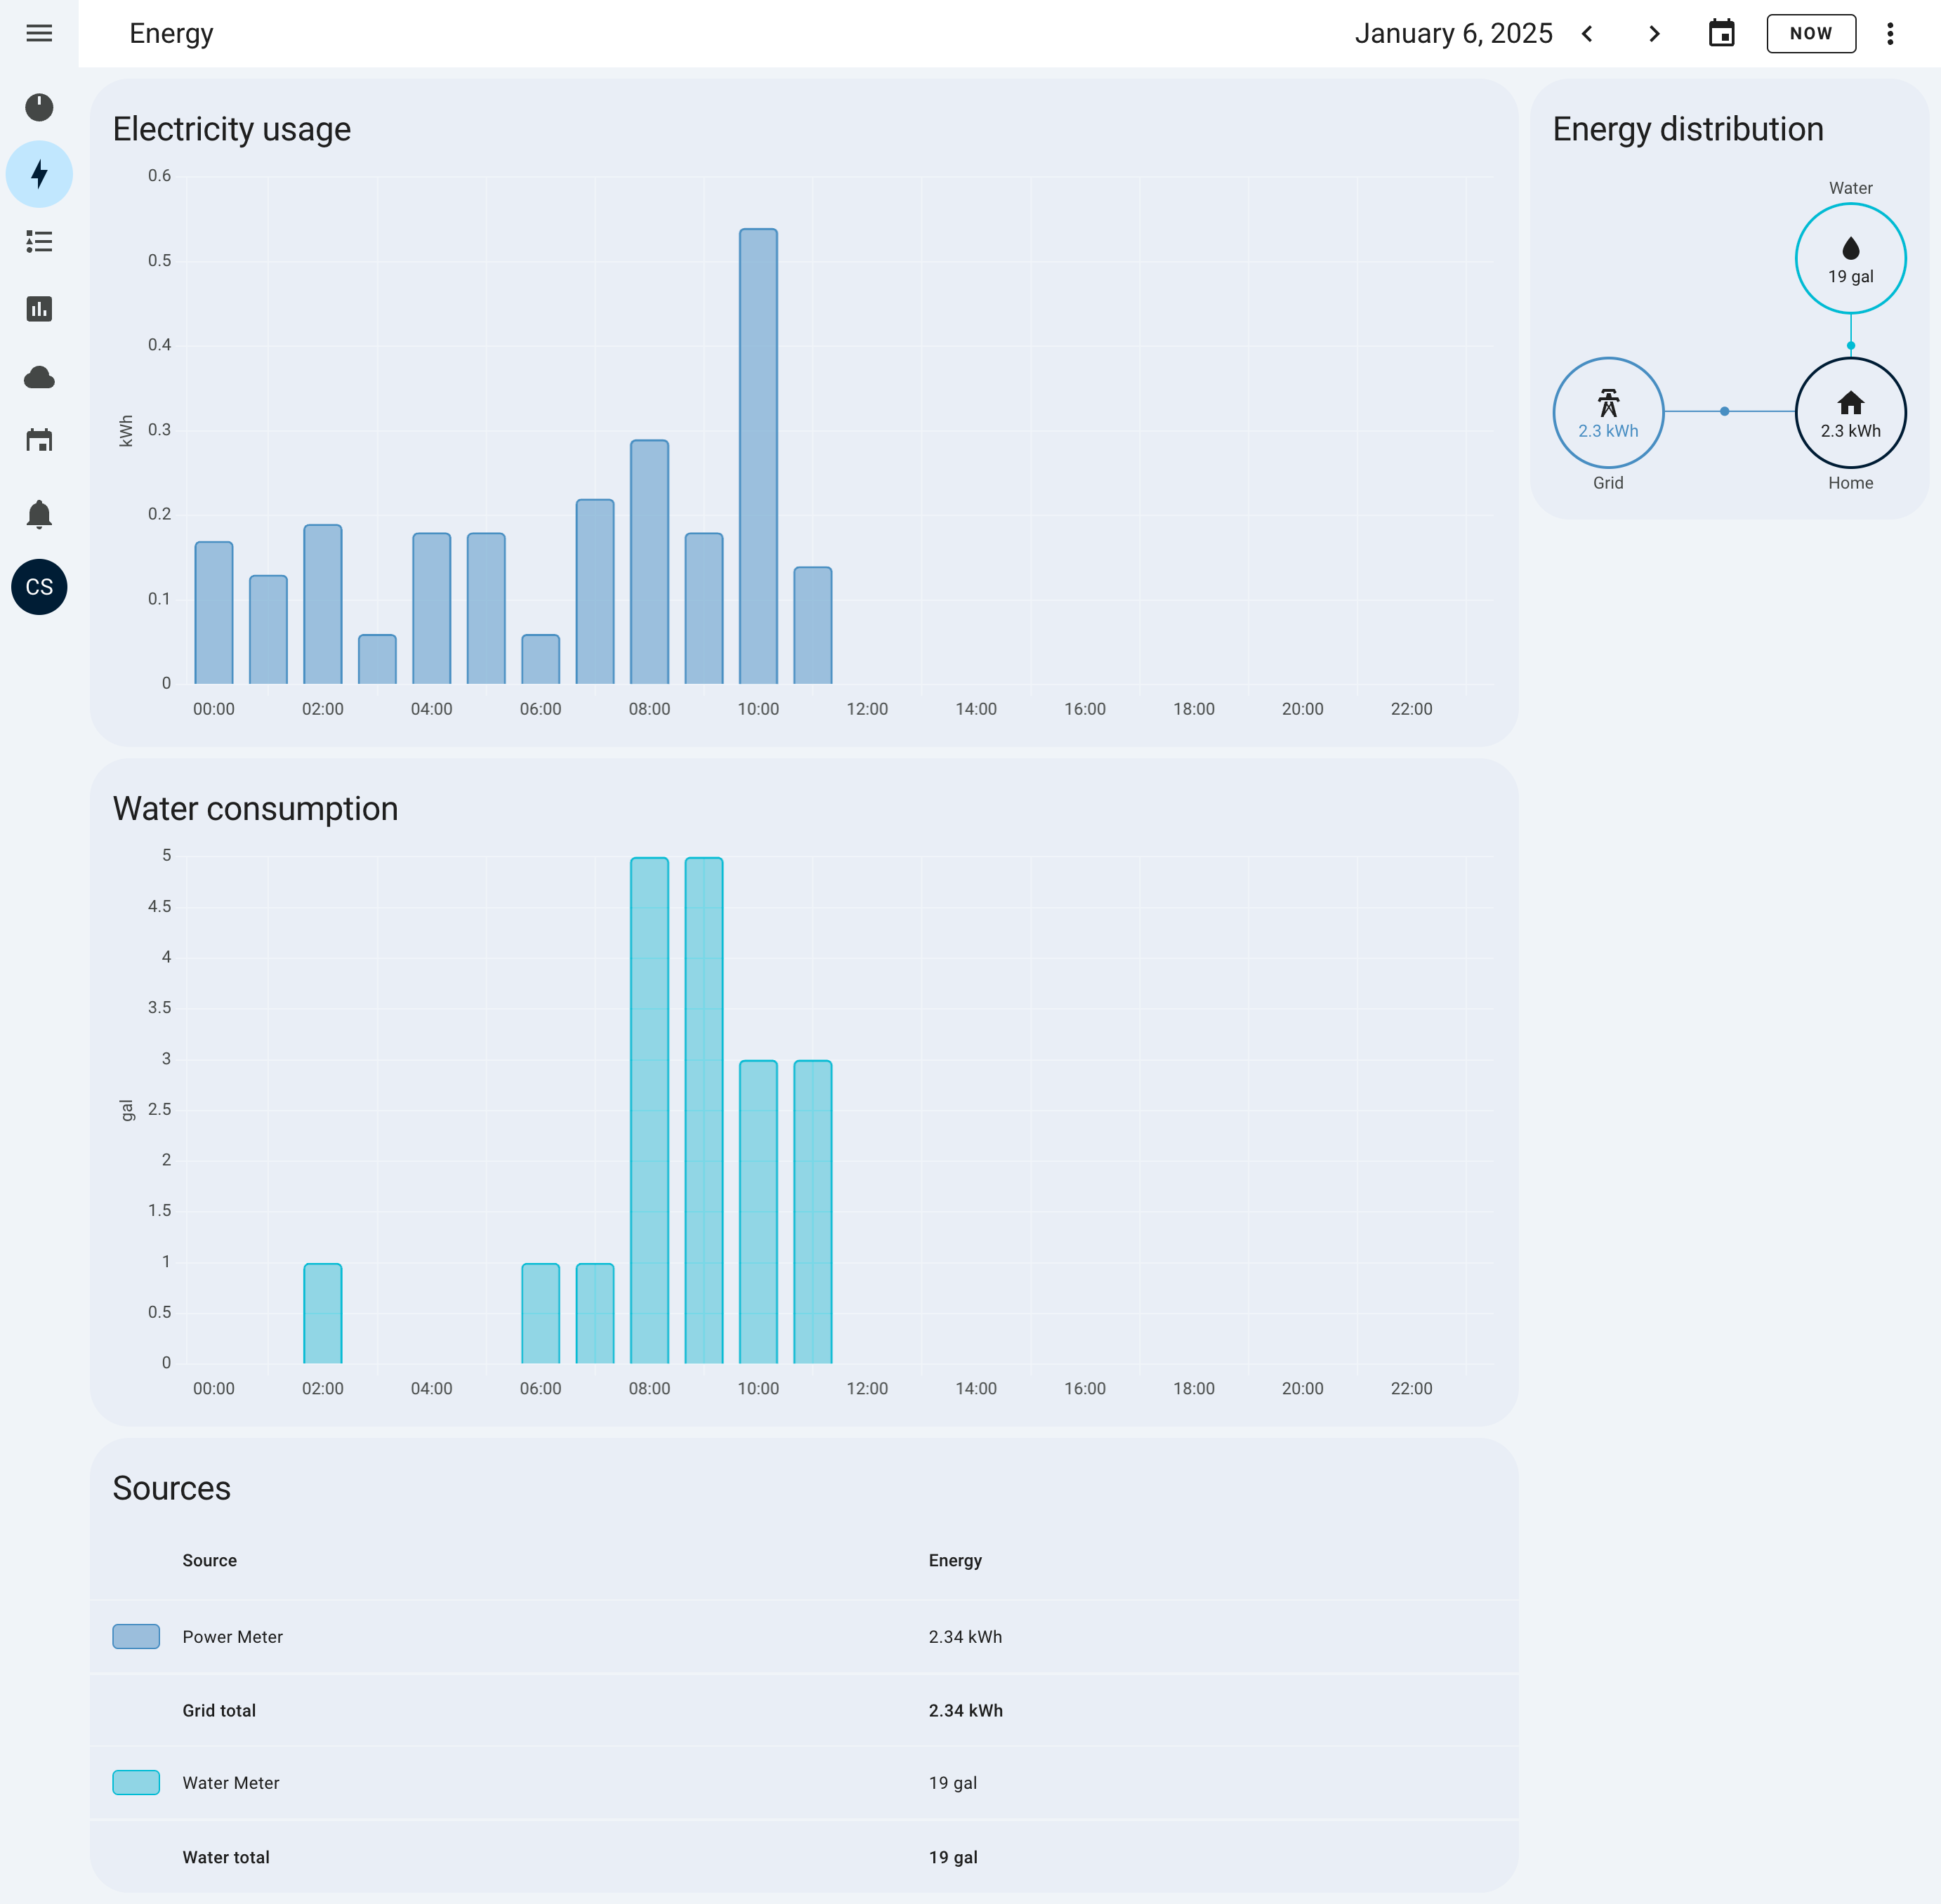
Home Assistant Energy dashboard
Credits
The following resources were invaluable to get started and refine my setup:
- XtremeOwnage’s guide to 433 MHz Temp / Humidity Sensors for the hardware recommendation and configuration.
- AMR2MQTT: Send AMR/ERT Meter Data Over MQTT for their HA sensor and Wh to kWh template
And, of course, credit to everyone who has contributed to Home Assistant!
Starting Setup
Here’s what I started with:
- HA running on a Raspberry Pi 5
- HA add-on for Mosquitto Broker
- Badger Water Meter using an ORION endpoint for monitoring
- Itron Centron CL200 power meter
Hardware/Software Added
I needed to add the following:
- Nooelec NESDR Mini 2 USB dongle to plug into HA to receive data from my meters (and other things down the road) - ~$35 USD at time of writing
- A short USB cable extender. The Nooelec is thick and didn’t fit anywhere on my Pi since I already had one slot taken with a Z-Wave receiver.
- rtl_433 Home Assistant Add-on to run
rtl_433in the HA OS Supervisor
Testing
Prior to setting up the USB dongle with HA, I wanted to test it locally to ensure I could capture the signals from my meters and quickly iterate on any changes to the rtl_433 config.
These instructions are specific to MacOS but should work with any *nix OS
Prerequisites
- HA Mosquitto Broker add-on installed and running
- USB dongle plugged in to your computer
rtl_433installed on your computer
Add an HA User for MQTT Access
Mosquito Broker helpfully requires authentication so you’ll want to add a new user to HA that is only used for this access with the following settings:
Active: yesLocal access only: yesAdministrator: no
Note the username and password for the next step.
Create an rtl_433 Config File
At a minimum we want to tell rtl_433 to:
- send its output to MQTT in HA
- use the 915 MHz frequency our meters use
- convert units to metric (SI)
To do this, use the following and save it to ~/.config/rtl_433.conf on your computer:
output      mqtt://localhost:1883,user=MQTT_USER,pass=MQTT_PASS,events=rtl_433[/model][/id]
frequency   915M
convert     si
Replace MQTT_USER and MQTT_PASS with the username and password of the user you created above.
Notes on this config:
- In my testing, I found out that
rtl_433uses IPv6 by default and doesn’t resolve mDNS addresses. In my setup this means I couldn’t usehomeassistant.localor an IPv4 hostname so I’m using localhost and forwarding it to my HA vianc(see below). events=rtl_433[/model][/id]will send data to an MQTT topicrtl_433[/model][/id]where[/model]and[/id]get replaced with the corresponding property values from the received JSON. e.g: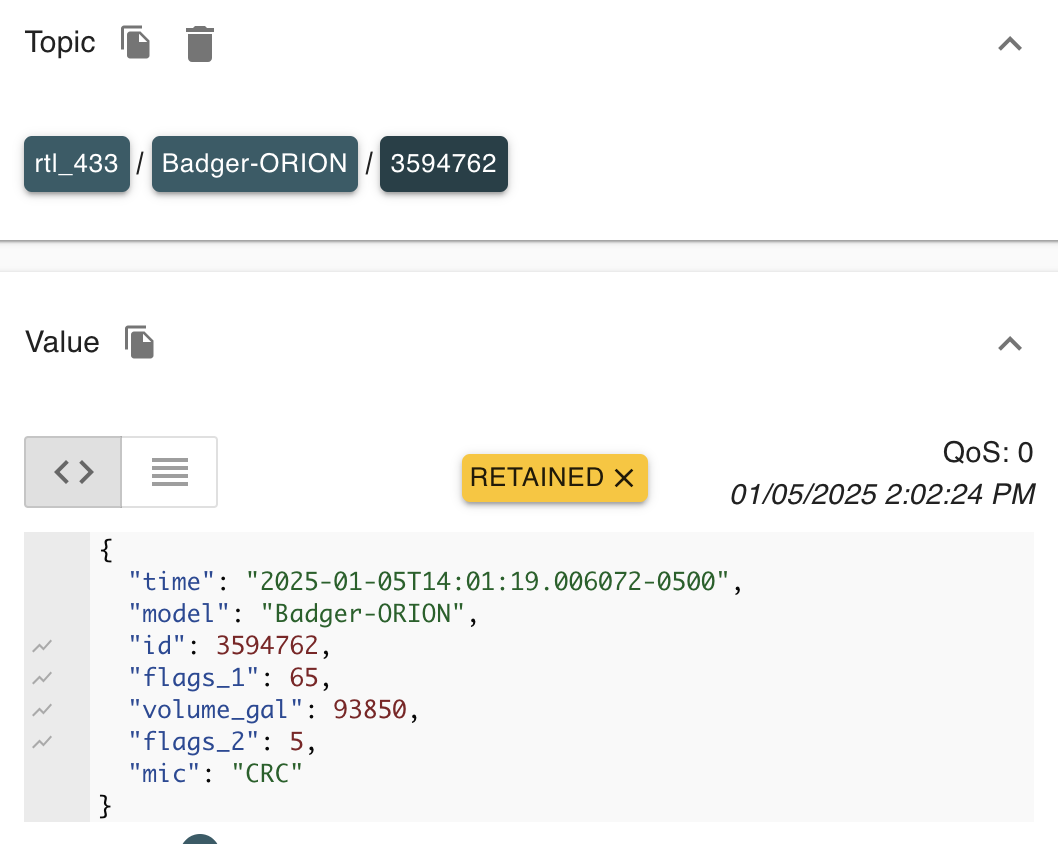
MQTT topic shown in MQTT Explorer
Run It
As noted above, I’m using nc to forward from localhost to my HA so in one terminal:
nc -l 1883 -v | nc [IP of HA] 1883 -v
and in another:
rtl_433 -F log -v
If everything is working you should see output like the following:
rtl_433 version 24.10 (2024-10-30) inputs file rtl_tcp RTL-SDR with TLS
Reading conf from "rtl_433.conf".
MQTT: Publishing MQTT data to localhost port 1883
MQTT: Publishing events info to MQTT topic "rtl_433[/model][/id]".

New defaults active, use "-Y classic -s 250k" if you need the old defaults

Protocols: Registered 230 out of 266 device decoding protocols [ 1-4 8 10-12 15-17 19-23 25-26 29-36 38-47 49-60 63 67-71 73-85 87-100 102-105 108-116 119-122 124-128 130-149 151-161 163-168 170-175 177-197 199 201-215 217-232 234-241 243-244 246-247 249-259 261-266
Input: The internals of input handling changed, read about and report problems on PR #1978
SDR: Found 1 device(s)
SDR: trying device 0: Realtek, RTL2838UHIDIR, SN: 00000001
Found Rafael Micro R820T tuner
SDR: Using device 0: Realtek, RTL2838UHIDIR, SN: 00000001, "Generic RTL2832U OEM"
Exact sample rate is: 1000000.026491 Hz
[R82XX] PLL not locked!
SDR: Sample rate set to 1000000 S/s.
Input: Bit detection level set to 0.0 (Auto).
SDR: Tuner gain set to Auto.
Input: Reading samples in async mode...
SDR: Tuned to 915.000MHz.
MQTT: MQTT Connected...
Baseband: low pass filter for 1000000 Hz at cutoff 200000 Hz, 5.0 us
It may take some time to receive data from your devices–my water meter is chatty every minute or so but my water meter goes quiet for hours.
Use a tool like MQTT Explorer to validate you are seeing any data you see received in the console log from rtl_433 in MQTT: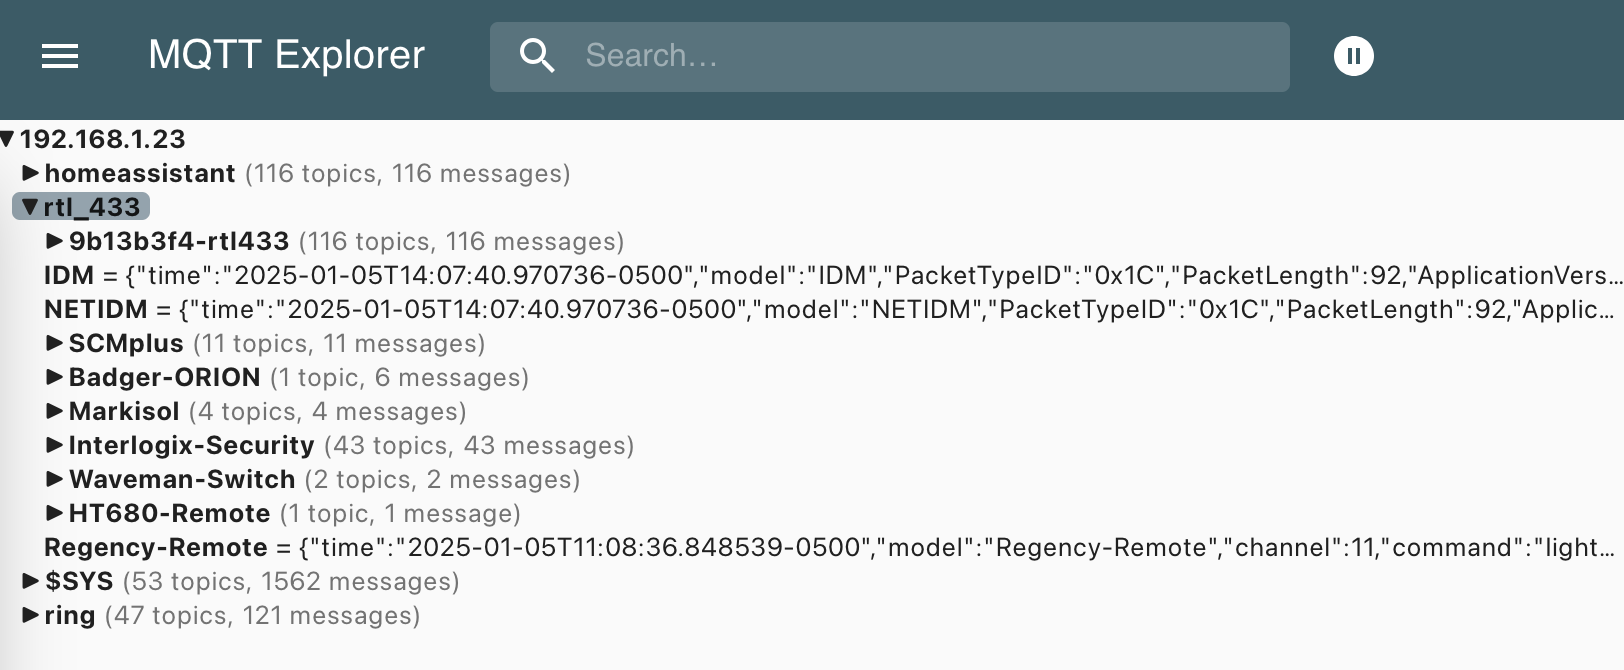
MQTT Explorer screenshot showing data from rtl_433
Adding to Home Assistant
Once you’ve tested everything is working you’re ready to install and configure the rtl_433 Home Assistant Add-on.
Create a New rtl_433.conf File
This will be a minimial config file to specify the MQTT output as the add-on has its own template for all other settings:
output mqtt://MQTT_HOSTNAME:1883,user=MQTT_USER,pass=MQTT_PASS,events=rtl_433[/model][/id],retain=1
Replace MQTT_HOSTNAME with the hostname form the Mosquitto Broker Info tab (most likely core-mosquitto) and MQTT_USER and MQTT_PASS with the user you created and tested with above.
This config file needs to be saved to HA’s config directory (e.g. /root/homeassistant).
Install and Configure the rtl_433 Add-On
- Go to
Settings/Add-ons/Add-on Storeand using the three dots menu chooseRepositories - Enter
https://github.com/pbkhrv/rtl_433-hass-addonsand chooseADD - In the Add-on Store search for
rtland choosertl_433andINSTALL - Toggle
Start on boot,Watchdog, andAuto updateto on
This will create a directory in your config directory named rtl_433 with a file named rtl_433.conf.template which is used to set the rtl_433 config for the add-on.
While this contains a config that will inherit settings from your rtl_433.conf file above, it needs to be updated to:
- Use the same topic name format we used in testing since the default does not work for our purposes
- Set the frequency to 915 MHz
- Convert to metric (SI)
- Use log verbosity equal to
-von the command line for initial validation–can be commented out later on
Edit rtl_433.conf.template:
output mqtt://${host}:${port},user=${username},pass=${password},retain=${retain},events=rtl_433[/model][/id]
frequency   915M
convert     si
verbose 5
Restart the rtl_433 add-on and review the Logs panel. You should see something similar to:
Starting rtl_433 with rtl_433.conf...
[rtl_433] rtl_433 version 23.11 branch  at 202311281352 inputs file rtl_tcp RTL-SDR
[rtl_433] MQTT: Publishing MQTT data to core-mosquitto port 1883
[rtl_433] MQTT: Publishing events info to MQTT topic "rtl_433[/model][/id]".
[rtl_433]
[rtl_433] New defaults active, use "-Y classic -s 250k" if you need the old defaults
[rtl_433]
[rtl_433] Use "-F log" if you want any messages, warnings, and errors in the console.
[rtl_433] Detached kernel driver
[rtl_433] Found Rafael Micro R820T/2 tuner
[rtl_433] Exact sample rate is: 1000000.026491 Hz
[rtl_433] Allocating 15 zero-copy buffers
Once data starts coming in, you should see the MQTT topics be populated and can verify this by looking at them with MQTT Explorer. They should look the same as when you tested them above.
Adding HA Sensors
Once the MQTT topics for your devices are showing up, you can add them as sensors. The configuration will vary depending on the type of sensor. Here’s my config for my water and power meters which gets included into the main configuration.yaml:
## Water Meter
- name: "Water Meter"
  state_topic: "rtl_433/Badger-ORION/3584762" # This needs to match the path as seen in your MQTT server.
  json_attributes_topic: "rtl_433/9b13b3f4-rtl433/devices/Badger-ORION/3594762" # This, should match the state_topic above.
  value_template: "{{ value_json.volume_gal | int }}" # This should match the json attribute containing your usage.
  device_class: water
  unique_id: 3584762 # This value needs to be unique PER sensor.
  unit_of_measurement: "gal" # This needs to match the measurement as seen in your MQTT events. You change your performance preference within Home-Assistant's GUI.

## Power Meter
- name: "Power Meter"
  state_topic: "rtl_433/SCMplus/1558932788" # This needs to match the path as seen in your MQTT server.
  json_attributes_topic: "rtl_433/9b13b3f4-rtl433/devices/SCMplus/1558932788" # This, should match the state_topic above.
  value_template: "{{ value_json.Consumption | int }}" # This should match the json attribute containing your usage.
  device_class: energy
  unique_id: 1558932788 # This value needs to be unique PER sensor.
  unit_of_measurement: "Wh" # This needs to match the measurement as seen in your MQTT events. You change your performance preference within Home-Assistant's GUI.
These get included in my main config via:
# 433_rtl
mqtt:
  sensor: !include 433_sensors.yaml
And I’ve also added a template helper to configuration.yaml for my power meter to convert Wh to kWh:
template:
  sensors:
    power_meter_kwh:
      friendly_name: Power Meter kWh
      unit_of_measurement: "kWh"
      value_template: "{{ (((states('sensor.power_meter')|int)/1000) | float) | round(2) }}"
You can now add the sensors/template helper to dahsboards and the Energy dashboard in HA.
Next Steps
You can use this same setup to monitor any frequencies supported by rtl_433. I’ll be converting some of my Z-Wave temp sensors to 433Mhz sensors due to the long battery life of the latter.
If you have any questions or feedback, find me on Bluesky at @chrisscott.bsky.social